 Jamboard is a collaborative whiteboard space that is free, simple and quick to use, similar to Powerpoint.
Jamboard can be used in synchronous (happening at the same time, in-person classes, live online meeting with the whole class or smaller groups) and asynchronous (content accessible online as needed) teachings.
Jamboard is a free web-based interactive collaborative whiteboard that is a part of Google. Log into your Google account and look in the listed apps. There is also a web-based version https:// jamboard.google.com and an app version for phone/tablet. You can use a stylus to write/draw on the board.
Note: There is a paid version that is part of the G Suite and has access to the board for handwriting, shape recognition and included physical hardware.
Students can work in groups collaborating in real time with text, images and drawings and even use as a presentation too.
Suggestions: Use as a live interactive tool by turning on edit for users. Use as a preview at the beginning of a lesson. Create a sticky note and ask students to record their observations. Add an image for students to observe. Students can add their own sticky notes as to what they see or to make predictions or inferences. Students could post their own images and description of what they learned as a summative activity.
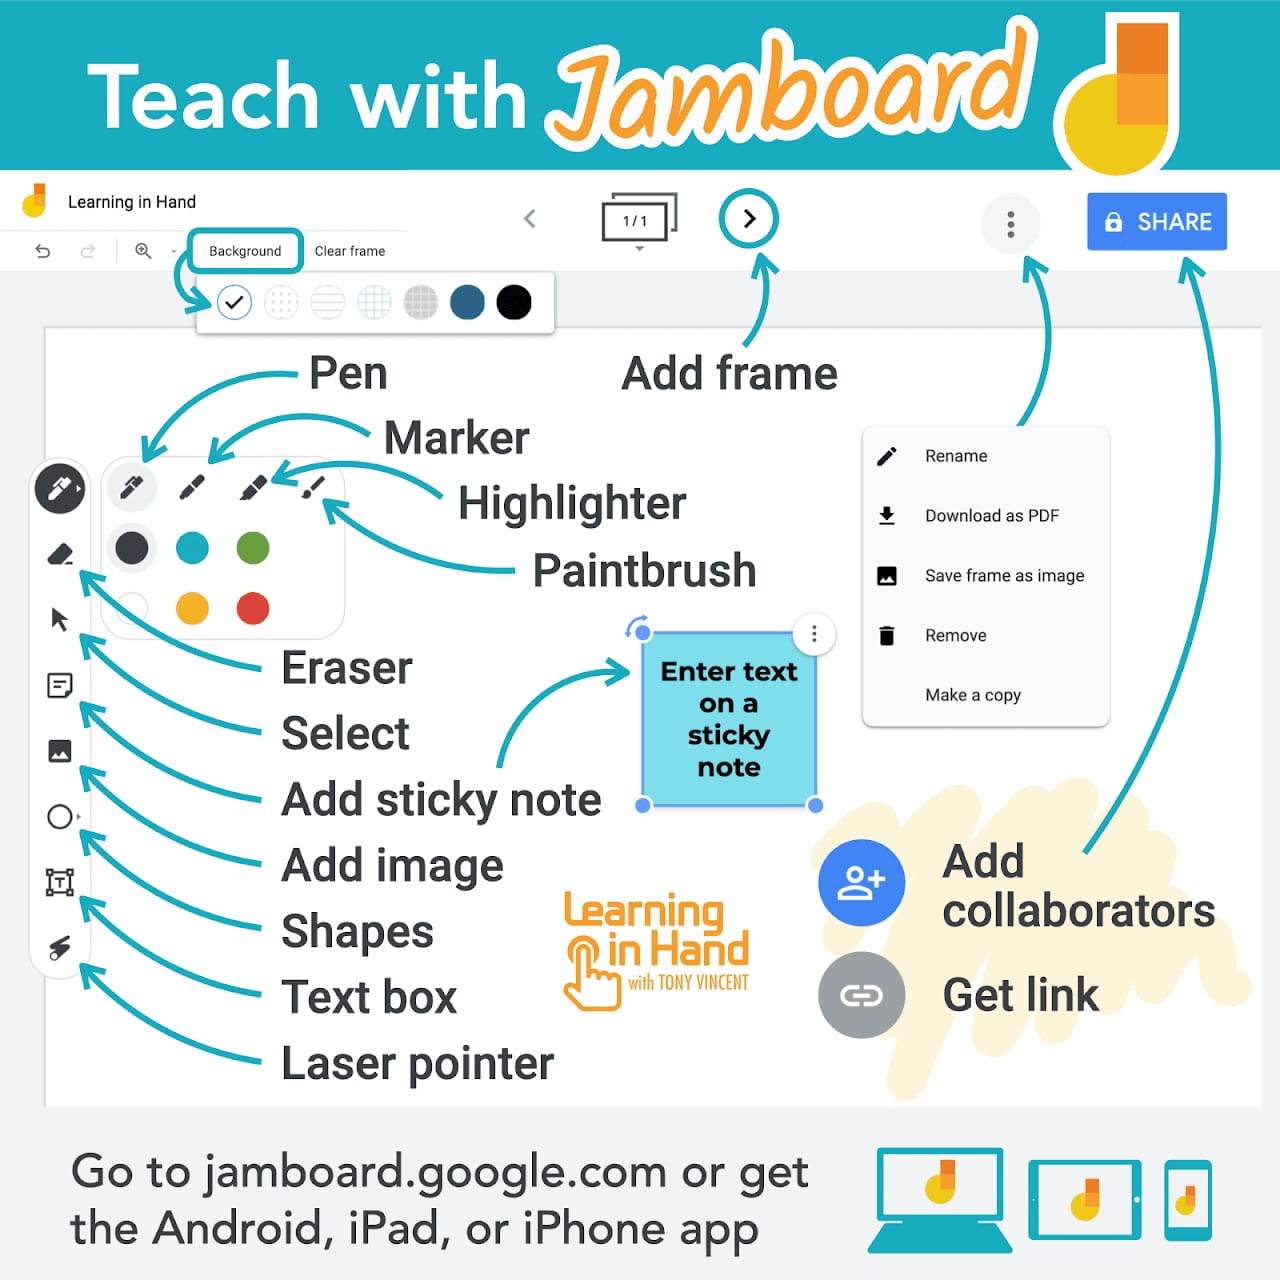
Resources: View a tutorial created by EdTech Classroom, The Ultimate Guide to Jamboard
Create Jamboard templates to share.
![]()
Use Padlet to write test, share video and screencasts, audio, images, and documents on the poster wall.
Some ideas for engaging students: brainstorming, informally access what they know, as group questions and share the responses, share resources (pair up to search and post permalinks).
Sign up for a free account to create up to 8 boards or ask for a TU account for creating unlimited boards. Email Duane Smith (dnsmith@towson.edu) for a TU account. https://tu.padlet.org
Sign in, click Make a Padlet, select a template (wall). On the right side menus, add a title, select a background (plain backgrounds are more readable), choose any referred settings, Start Posting.
Click the plus sign and click on the board to write or double click anywhere on the board. Within each box you can write, upload a file, paste from clipboard or link a site.
Sharing your Padlet with others
1. Click the share icon at the top of your Padlet to select sharing options (link, QR code, etc).
2. Under the share menu: Set the appropriate privacy settings by clicking on “Change Privacy” (defaults to private which means others cannot access even if they have a link; change to password, secret, public, or org wide to share). For instance, make the password the course number. If you choose “secret” anyone with the link can access the board.
Take a look at the previous pop-up on Padlet by Sara HooksPadlet Digital Wall for class examples.
![]() Canva –create a poster, infographic, flyer, brochure, presentation, video, and more.
Canva –create a poster, infographic, flyer, brochure, presentation, video, and more.
–online free infographic design tool. Design, collaborate, publish
Drag and drop a template and select designs, images, icons, frame elements. Add single or combination text boxes. Use uploads tab to add your own images. Use the tool bar to change colors. Your design is automatically saved as you work.
Choose to collaborate on your design by sharing a link or inviting people by email.
Click on Publish to download as an image or pdf. or to share the infographic on social media.
Quick tutorials https://designschool.canva.com/tutorials/getting-started/
canva.com
Infographic Tools to Engage Students. Brittany Quinn, SPED. (Student example)
One thing I did was for review/discussion of assigned readings. There were 3 short journal articles due for class that week. I split students into 3 breakout groups and assigned each group one of the articles. They were given time to create an Infographic covering the main points of their reading. They were able to use Padlet, Canva, Jamboard, or GoogleDoc. The infographics had to include images and key points. When returning to the main room, each group was able to have someone share their screen and they talked about their infographic. Students seemed to enjoy the creative aspect!